A few days ago, I wrote about building an always-on Home Assistant monitoring screen for my solar plant, electric vehicle, and security camera. I used a $60 Android tablet and it works great, but I left out some configuration details.
configuring the tablet
I used the tablet as it came, out of the box. I did not sign into Google or any of their services, including Play Store, email, etc. This was important to me to preserve my privacy. You should be forewarned that Google will ask you over and over, with increasingly deceptive descriptions and dire warnings, to sign in. This will all work fine without signing in and, since you cannot really password protect the tablet if you want an always-on display, it’s best that the tablet not have access to any of your accounts.
configuring Home Assistant
an account for the monitor
The status monitor will need to access your Home Assistant server, however. For this purpose, from your Home Assistant dashboard go to “Settings>People>+ Add Person”. I created a “person” called Tablet, “Allow login” on, a decent password, “Local access only” (assuming the tablet will be on the same LAN as your Home Assistant server; if someone nicks your tablet they won’t be able to monitor your home remotely), Administrator off (important!). You can then select the locations/devices/entities that the tablet will be allowed to access.
a dashboard for the monitor
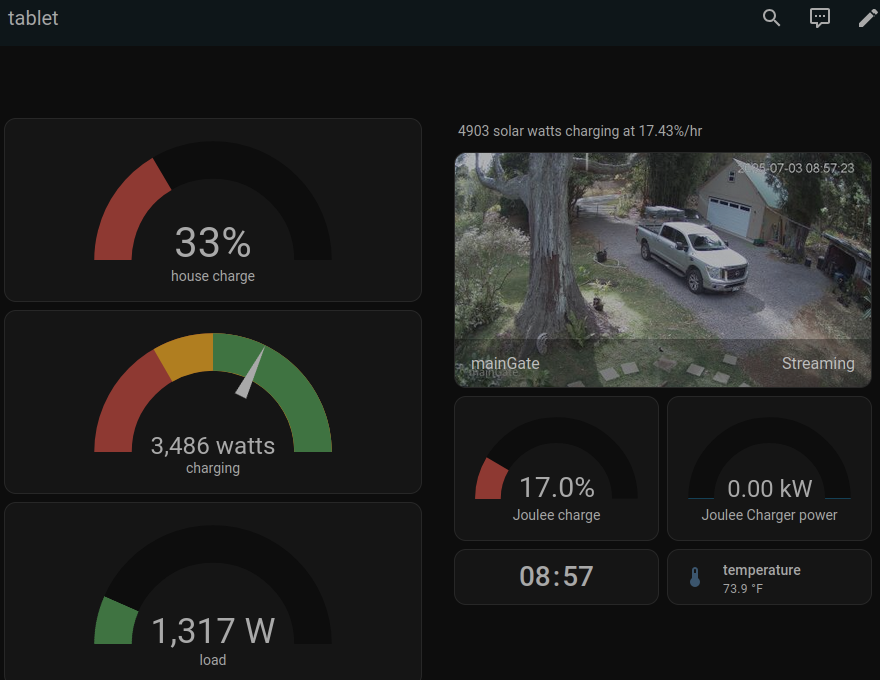
You’ll want to create a dashboard that you can tailor to your monitoring needs and the dimensions of your tablet’s screen. For reference, here’s the YAML code for my tablet dashboard. It’s uncommented and uses entities that are unique to my system, but it can give you a starting point.
configuring the browser
The Chrome browser on Android doesn’t have a straightforward way to get a full-screen mode. By default, it shows the Android status header, the Chrome address bar, and tabs. Ugly at best, and a waste of valuable real estate.
The first thing you want to do is create a bookmark for your monitor page. In fact, create two and name the first one “monitor” and the second one “fullscreen”. Then edit the “fullscreen” bookmark and paste this into it where the URL used to be:
javascript: (function(){ document.querySelector("body").requestFullscreen().then(() => { document.querySelector("body").style.overflow = "auto"; }); } )();
Use the Monitor bookmark to navigate to your dashboard. Sign in with the credentials for the “Tablet” account. Cringe in horror at the needless, ugly interface elements. Tap in the address bar, and type “full” and the “fullscreen” bookmark should appear. Tap it, and gaze in wonder at your full-screen status monitor.
—2p