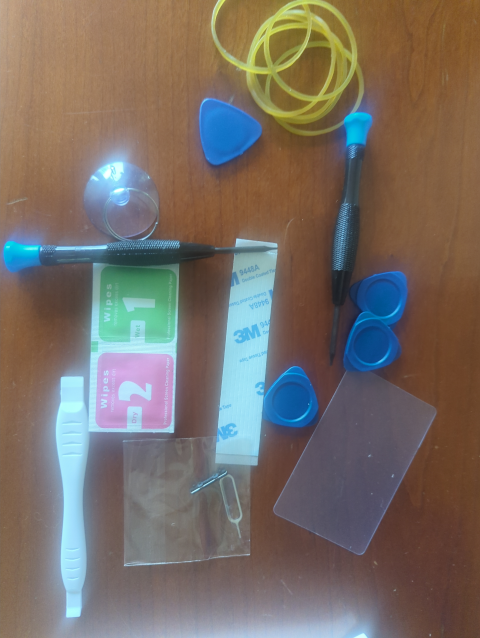
Remember that on a flight last week, the power button had fallen out of my phone and got lost on the plane. I had to set the phone to always stay on, then be careful not to let it discharge. Even then, it was kind of edgy going through airports because sometimes it would go to sleep and was difficult to wake up (plugging in power sometimes worked, and eventually I found I had some tweezers that could poke the button if I was careful, but neither thing worked 100% of the time). I was in fear of not being able to retrieve my boarding pass at a critical moment. The missing button was a hassle but the replacement arrived today. The button itself is just a tiny piece of plastic. I didn’t think $8 was a ridiculous price for it because of the logistics, but I was surprised to see that it came with a complete toolkit with a suction cup, a plastic card, multiple spudgers, many rubber bands, a screen cleaner, and more.
What it didn’t come with were any kind of instructions. Pretty clearly I was meant to disassemble the phone to replace the button. When I had originally researched the problem, though, I was assured by multiple parties that disassembling the phone was not only unnecessary, but undesirable. The button can simply be pressed back into the port. I tried it and, indeed, that’s all it took. So now I have a phone disassembly toolkit I hope to never need.
Before that, though, I ran into a bigger problem. I applied a Home Assistant update, and Home Assistant died and wouldn’t come back on line. That’s important. Home Assistant powers dashboards on the kitchen wall, on my phone, and at my workstation that show the current state of charge for the house and the car, the rate of charging/discharging, and the total load. It also shows a preview of surveillance cameras at the front gate and the solar panels, where the power is coming from (solar panels, generator), the time until empty or full, the outside temperature, the temperature of the hot tub, the temperature of the freezer in the garage, the rainfall since midnight, and a list of significant loads (the hot tub, three point-of-service water heaters, the car charger, outdoor lighting, the oven…). It also lets me control the floodlights on the surveillance cameras.
I have it set to send me an alert when the freezer temperature goes above critical.
I can use it to control the temperature of the hot tub.
Since the house can actually use more power than the 15kw inverter can deliver (8kW for the car, 5kW for the dryer, 1.8kW each for the three water heaters, 1.8 kW for the toaster oven, 1.1kW for the hot tub…) Home Assistant will shed non-critical loads (like the car charger and water heaters) to keep from overloading the inverter. It will also shed loads when the total state-of-charge is getting critically low.
The most complicated thing I have Home Assistant doing is managing the car charging so that the car (85 kWh capacity) will usually have a usable charge but without depleting the house batteries (20 kWh capacity). The algorithm for that turned out to be pretty gnarly, due in part to the fact that Tesla will disable the APIs if you call them too often (but do they define “too often”? no, no they do not) and their latency is wildly unpredictable. The weather here is also really unpredictable, so we might be generating 11 kW now, but an hour later that could be 600 W so you have to monitor closely and make frequent adjustments.
In other words, without Home Assistant it takes a huge effort to keep the power management working.
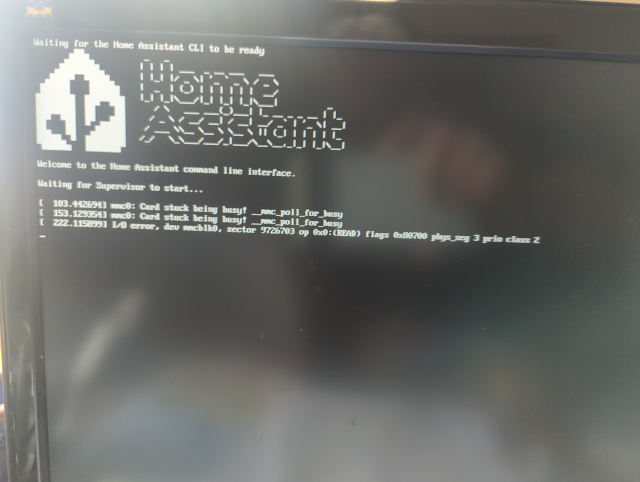
The problem with a headless server that doesn’t reboot is that you’re left in the dark (though not literally). I needed to connect a monitor to the Raspberry Pi that’s hosting Home Assistant, but that requires a special cable that I haven’t seen in years. My cable collection is epic, and I thought that finding that one cable would take hours, but I was actually able to find it in only a few tens of minutes. I connected a monitor to the server, and found that it would boot only intermittently and would eventually report I/O errors. I didn’t have any spare SD cards, either. Sigh.
I decided to use an old trick. Using the linux dd command, I found I was able to read everything on the card into a file on my laptop without errors. (dd is pretty good about recovering from errors that will stymie ordinary I/O calls.) It took a couple of hours. I took a couple of hours more to copy the data back onto the card. Wonder of wonders, re-writing the data has fixed (though likely only temporarily) the I/O errors and Home Assistant is back up and running, probably in time to get my hot tub up to temperature before bedtime.
Before I was able to use dd, though, I had to find the disk ID which involved running fdisk -l and I discovered that I could not type the l (letter el). Every other key on my keyboard worked, just not the letter L. How very strange. Stranger still, rebooting the machine restored the L, but only for a few minutes. What?? That particular problem was a strange one. I have an old Apple wireless keyboard that I use to access our Apple TV. It had gone dead, and I only had a very short lightning connector cable with which to charge it. I had plugged it into an unused USB-C port on my laptop for charging. What would happen was when the keyboard charged enough to boot, it would connect to the laptop as a keyboard (I didn’t know you could use it wired!) and the L key was stuck down. Sheesh.
It wasn’t what I had planned to do with my day, but I’m glad I finished the day with a working solar plant. And a working power button on my phone.
—2p